Saturday 28 September 2013

Summer Homework..

Only 2 and a half days left till I start university and still haven't completed my summer homework; currently stressing real bad! I always have a habit of leaving work till the last second and then stressing about it.

Right now I'm playing animal crossing rather than doing my summer homework haha :-(

Well here's what I drew last night, took about 2 hours. Only using mechanical pencil on A3 paper. My favourite album The Script #3
The summer homework is to create a presentation about myself in any format we wish, but there is a list of questions about yourself included which you must answer. This is for the question about my favourite album/song

Also did a drawing of HellBoy using Sharpie and felt tip pens. This was for my favourite movie! I wanted to draw out a Pan's Labrynth screen because I really love that film so much, but I couldn't find any good photos of any characters online so I found that too time consuming to look for a good photo to use as reference. I ended up drawing HellBoy haha :P


Time to do more of it now!
The questions I was given were:
-your name
-where you live
-the name of your last course and university
-3 physical measurements
-your favourite item of clothing/outfit
-an interesting fact/s about you
-the thing you can do that not everyone can do (your talent)
-your favourite musical track
-your favourite book or film
-some pieces of statistical information about you
-what you hope to achieve on the course
-anything else you would like to inform us about

HAHHAHA wow, I've currently only done 3 of the questions :------(

OKAY I'LL GET A MOVE ON WITH IT NOW. IT'S DUE TUESDAY, I HAVE 3 AND A HALF DAYS

Wednesday 18 September 2013

DIY pocketsized Togepi felt plushie: tutorial+pattern


Hiii, so this is my first time ever making a tutorial so i'm sorry if some of it might not be understandable or if i miss some steps! i'll try my best :D so i decided i wanted to make a pocket sized Togepi plushie tutorial because i searched online for ageeeesss looking for a tutorial and pattern for a togepi so i could make one for my friend but couldn't find a pattern anywhereeeee! but now i have made one hehe ^__^

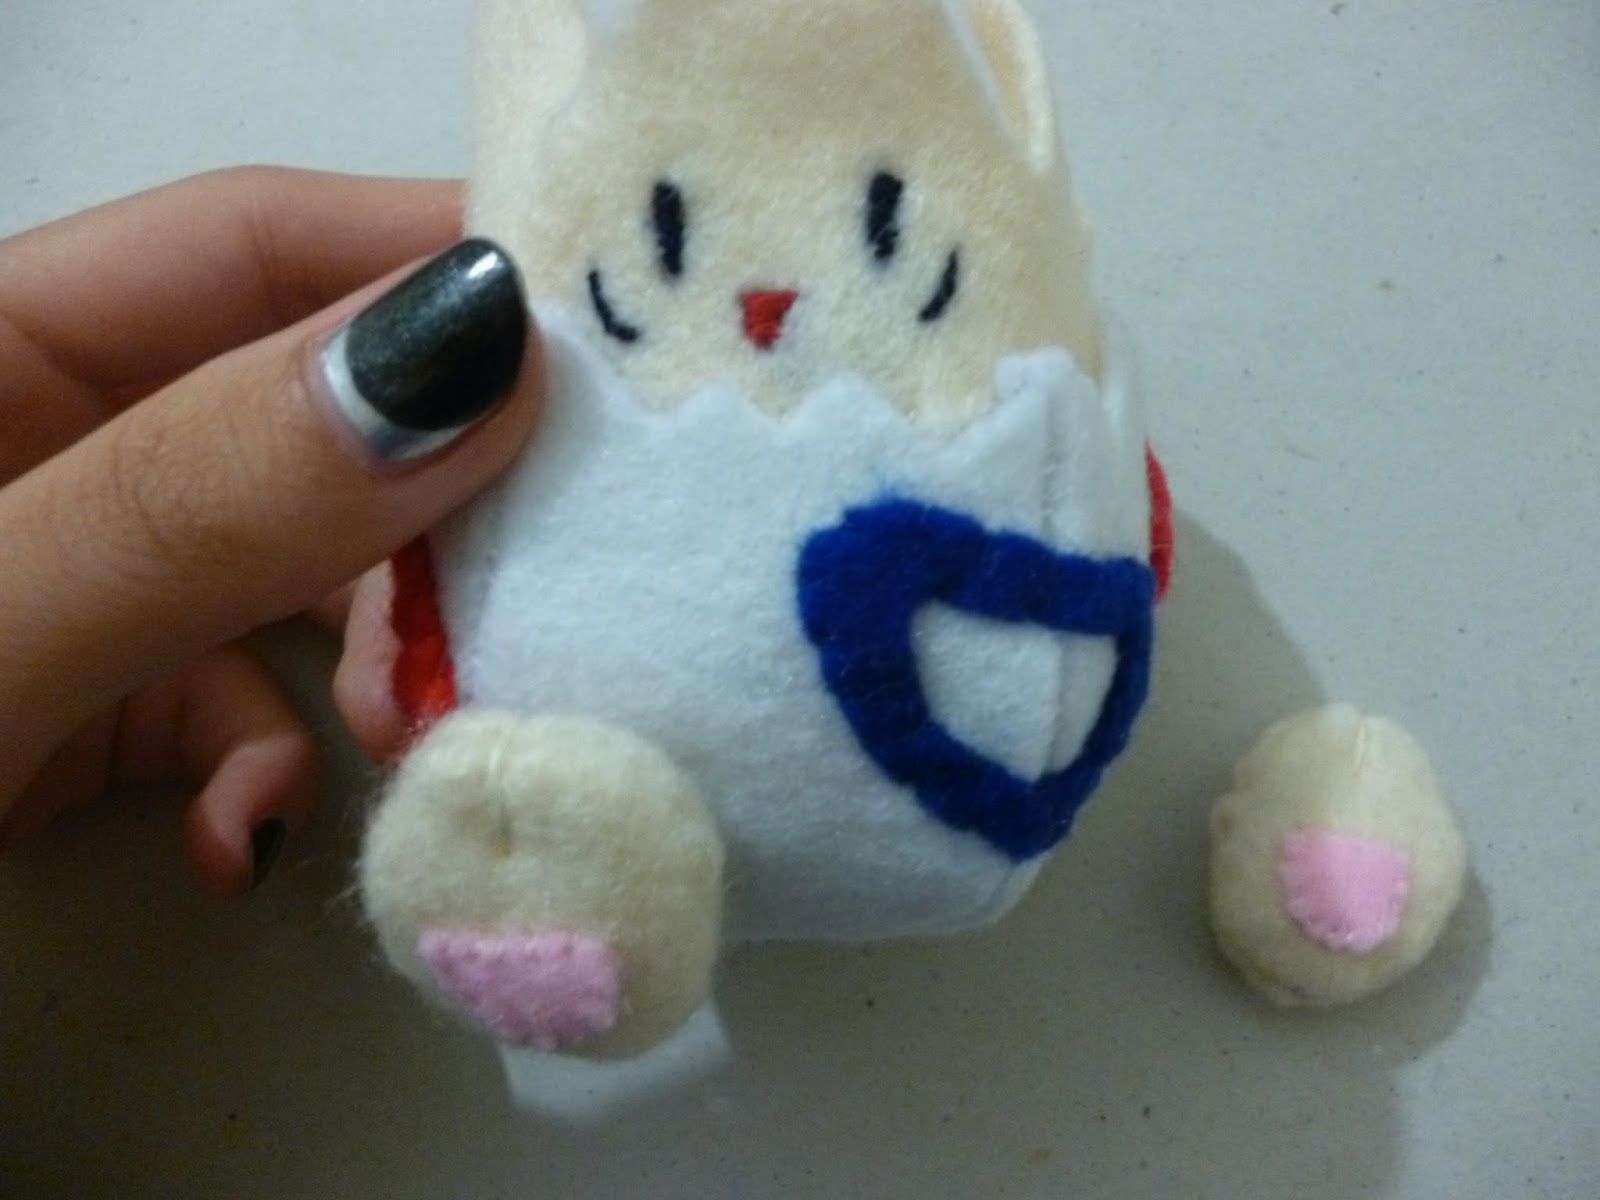
This is also the first attempt of making a togepi plushie which fits on the palm of my hand measuring around 3 and a half inches tall. I made it so that it sits down but you can always adjust any parts of it so it can look however you want. you can also just size up the pattern pieces if you want to make a larger scale one!
~ ~ ~

So lets start! umm first, materials:
- skin colour, white, pink, red and dark blue felt (i used a really light skin colour for togepi's head, hands and feet but you could change that if you wish)
- red, black, blue, beige and white thread
- cotton stuffing
- fabric glue
- pins
- needle

and here are the pattern pieces that i drew and cut out myself (i wouldnt recommend printing this off as some pieces may need size adjusting depending on how you make it)
PS: i am using a 0.5cm-1cm seam allowence for all the pieces that need to be turned inside out, you can change this if you want to.


After cutting out the pieces onto the felt, you start off with sewing an egg shape with the 4 pieces of skin colour.
ABOVE:
1. place one on top of the other and then sew down one curved side. repeat this with the other 2 pieces.
2. opening up the unsewn side on both pieces, pin two of the unsewn sides together and then repeat step 1 on this side which has been pinned together (no pins in the photo because i usually only use pins when i absolutely need them)
3. now turn the egg shape inside through the last unsewn side and stuff with cotton sutffing till very full so that it makes an oval egg shape.
4. sew up the remaining side after fully stuffed.

HAND EMBROIDERY I THINK? making the face! :D you're going to use the zig zag with a flat side and this will be togepi's face/head.
ABOVE:
1. draw out togepi's face onto the center using a photo online as a guide
2. i think this is hand embroiding.. using red thread to create the mouth. you start from a top corner of the mouth and then straight to the other top corner of the mouth so you create a single red line on the top of the mouth. continue this to the bottom of the mouth by just moving side to side and also moving in slightly each time so you create a little triangle for the mouth.
3. using the same technique in step 2 make an eye
4. create the other eye and the lines. (i think its always easier to do one whole side first so that you can copy from the side you have already done to mirror it ^__^


Next pin togepi's face around the top of the egg making sure it sits on there so that the back links up. i find it easiest to make a crown with the togepi face and pin this together and then pin it onto the egg body! then sew this onto the egg body! and now you basically have a naked togepi :P


next we are going to make togepi's egg shell for him! ^3^ (i originally thought i needed 4 of these pieces but i ended up needing 5 of them, so the number of pieces you need here may vary depending on what size you've made your togepi egg body)
ABOVE:
1. with the 5 of the white egg shell pieces, you are going to do the same thing as you did when making the togepi egg body at the start. place one piece on top of the other and then sew down one side. repeat with another two pieces.
2. pin the next side on making sure it your togepi body fits inside it. you may need to add or remove some egg shell sides! :o
3. sew all the sides together the same way as step 1
4. turn your egg shell inside out and make sure togepi fits inside it well!

decorating his shell!
ABOVE:
1. draw some triangles of different sizes onto red and blue felt. (look at a photo of togepi online to see the shapes that are on his shell!)
2. cut these out
3. now cut holes into the center of them


with these shapes all cut out, you can sew these onto the egg shell using red thread for the red triangles and blue thread for the blue triangles OF COURSE :D (you could always just use fabric glue to glue these down if you cannot be bothered to sew them on)


place the togepi body into the egg shell and line up where you wish to shell to stay on his body. once done, cut a tiny triangle off from the shell in the front of togepi's face so that his face isn't covered up! AS SHOWN ABOVE ^^. umm now put a little amount of fabric glue within the insides of the egg shell (do not put lots of this on in patches as it will bleed through the felt and would take longer to dry)


ARMSSSS!! well hands :~)
ABOVE:
1. cut the 4 pieces out onto skin colour felt
2. placing one on top of the other, sew around creating the hand shape
3. turn this inside out and then stuff with cotton stuffing
4. repeat step 2&3 with the other hand.

THE LITTLE TOGEPI FEET!! C:
ABOVE:
1. cut out the 4 small ovals for the feet
2. cut out the two pink semi circles for the pads on the bottom fo togepi's feet! :D
3. placing one piece on top of the other, mark off the size you actually want the feet to be
4. sew half way around the foot.
5. turn the foot inside out
6. stuff the foot
7. sew up the opening edge. (to hide the stitches you have to carefully fold the open edges inside to make the seam allowence inside, pin this together. and then stitch but doing a running stitch through the inside seam allowence you folded
8. sew the little pink pads onto the bottom of the feet. optional: you can sew toes onto his foot too


 sew his feet onto his body where you want them to be!


Sew the hands were by togepi's side so he looks happy :P (The hands i made for him were too long so i had to cut them down quite a lot)

YYAAAYY AND FINISHED!! hope some people do use my tutorial and i hope you can understand it. sorry if you can't understand some parts P:


~ ~ ~

Please leave a comment if you use my tutorial! and links if you decide to make one from my tutorial, i'd love to see! thank you for reading :D

///////////giving this little plush to my friend, Leanne. hope she likes it hehe. its her favourite pokemon :~)

Tuesday 17 September 2013

Another plushie making day!

Horray! Had a fun day today ^3^

Meet my friends Leanne and Yas down at Romford today to buy some materials from The Range and then we headed back to my house! We watched Free Iwatobi Swim Club together c:

Then we made plushies together! Leanne had to teach Yas how to sew because she didn't know how to hehe but I think she had fun with her first time sewing a Slenderman plushie ^___^

After seeing her Slenderman, I decided to download it onto my laptop to play LOL. AND YEAH, Yaz was using the keys to walk and I was controlling the directions of the torch.... THEN SLENDERMAN APPEARED FROM NOWHERE AND WE BOTH SCREAMED HAHA, it was so funny hehe ;D

Ah then my mum bought us all KFC for dinner before Yas and Leanne had to go home!

Wish I took more photos but I kinda forgot haha ~ ~ ~ ~


Leanne and Yas busy with making their plushies


Oh and I made a Domo-kun plushie and a donut keychain plush ^______________________^


Hehehe I love this donut keychain I made! Going to put it on my backpack for when I next go out!

FUN FUN FUN FUN DAY. WELL I ENJOYED IT AT LEAST. I hope my friends enjoyed it too :x

Monday 16 September 2013

DIY miniature book charms

Hmm well I made these miniature books quite awhile back.. around May 2013 and I think that they look super cute! I used a few different tutorials online and took parts from each of them to create my own. I originally made 4 but I gave 1 away to my friend on her birthday and another 1 to my sister ^3^

These are the 2 I kept for myself. I turned one into a necklace and the other one is a keychain! I didn't have many small things that I could had used to decorate them so I had to improvise by cutting apart an old broken skull bracelets and using the metal skull beads; then also using old golden chains and bracelet parts c:


They take quite a little while to make, around 30-60 minutes because of waiting for the glue to dry most of the time. I think the hardest part was using a ruler to rip of tiny pages that all had to be the same size! Haha - I ended up ripping and wasting quite a few sheets of paper because it was so tricky.


As you can see how small and cute they are from the photos above!

..
I want to make tutorials for things that I make but I get worried that no one would use them and think that it would be a waste of my time if I made tutorials :-(

But if people comment and ask for a tutorial for anything then I would be more than happy to make a tutorial for you guys reading this! But I'm starting university on the 30th September so I will be very busy after that date!

#peaceout :)

Sunday 8 September 2013

Kawaii kitty keychain

I made this kawaii kitty keychain by hand and entirely from felt!

I made my own pattern for this as the design of it was originally for a soft cat plush keychain, but I reversed it making the stitching outside.

This is the photo I found on google of the cat plushies which I took inspiration from: 


And this is my final outcome which I made myself! A kawaii kitty plush * o *
Fits in my hand and I also attached a ribbon on its head so that I could use it as a keychain c:
Cute huh! 


DIY Drifloon plush

Hi, so I made this Drifloon plushie from by hand with felt ^__^ it looks soooooo cute! I'm so proud of it because it looks adorable and I took my time on the stitching for a change and it looks nice and neat :D

The tutorial I used is here:
http://plush-lore.deviantart.com/art/Drifloon-Tutorial-322735283
However I did make an adjustment which was making the yellow hearts 3D by stuffing them (this isn't included in the tutorial I used), I think this made the whole thing more 3D and gave it more shape :-)

So happy with it! Here's how it looks: 


Comparison of size as it sits on my bear who is about 30cm tall. ^ u ^

Saturday 7 September 2013

DIY Aipom plushie

I made an Aipom (Pokemon) plushie by hand without a pattern or tutorial! It took around 9 hours to complete as it was difficult cutting all the patterns out the right size. I had the most trouble making his oval head and it needed a lot of adjusting once I sewed the head together =^=

Ah but in the end after an entire day of sewing, I think the outcome for it looks great! He fits right onto my hand ^____^

Materials I used to make him:
-Purple, skin colour, black & white felt
-Black embroidery thread
-White, purple & black thread
-A piece of wire


haven't seen a tutorial or a pattern template for making an Aipom plush online.. But if anyone would like to know about how I made it then I'll be happy to draw out a pattern for you and give you some instructions for it as well :-)

I put a piece of wire in his tail so that it could bend into shapes and hang onto objects! I made Aipom hang from the light in my room as you can see below ^.^ had a lot of fun making him